Assets
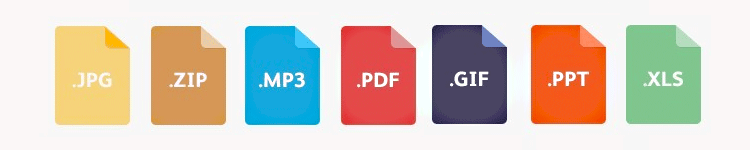
Assets are external files managed by Statamic. They can be anything from images and videos to documents and zip files. Just like entries and pages, they can have custom data attached to them.
Overview
Assets are grouped into Containers and can have their own fieldsets attached to manage extra data and information. Like such as…
- Images can have their own alt tags, captions, and display controls.
- Videos can have transcripts, descriptions, and credits.
- Zip files can have descriptions and MD5sums.
Containers
Each Asset Container is essentially a directory located locally or on Amazon S3 that can contain any number of files, file types, and subfolders.
Each Asset Container and its configuration is represented by a YAML file inside site/content/assets. The name of that file (e.g. main.yaml) the container ID (main).
The container holds the details about the root location of its Assets, as well as default data set on each Asset. The location can be a local folder or credentials to an Amazon S3 bucket. See the Asset Container Drivers for more detail.
You can use the wizard in the Control Panel found at Configure > Content > Assets, or use the CLI command:
php please make:asset-container
Managing Assets
Any files placed within a container’s directory will be recognized and treated as assets. Subfolders are supported. Organize however you’d like.
You can reference assets within your content by using its URL. For example:
title: Vacation to Italy
photos:
  - /assets/vacations/italy/trevi-fountain.jpg
  - /assets/vacations/italy/colosseum.jpg
Private Containers
There’s always an exception to the rule. If you have a private container, perhaps located above webroot to protect your downloads, you’ll need to also reference the container ID in your filename. See Private Assets for more detail.
Control Panel
In the Control Panel you have a number of ways to interact with your Assets.
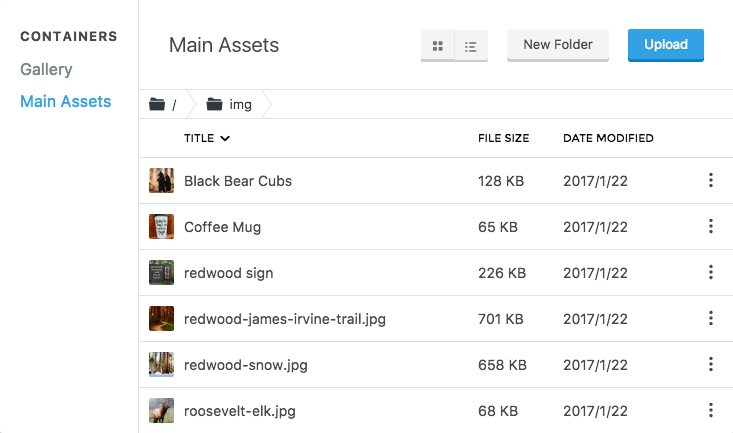
You can use the Asset Manager to browse, edit, manage all your Assets across all containers, in one location.
Asset Manager
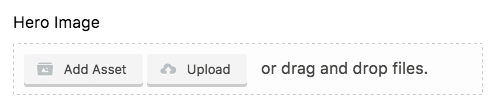
You can also use the Assets fieldtype to browse, select, upload, reorder, and remove assets from your content.
Asset Fieldtype
Moving or renaming assets (either manually or through the Control Panel) will not automatically update your content, which may result in broken links. Thankfully the fix is only a Find & Replace away, right?
Templating
As assets are referenced in your content data by their URLs, you can iterate over the array directly:
{{ photos }}
  <img src="{{ value }}" />
{{ /photos }}
<img src="/assets/vacations/italy/trevi-fountain.jpg" />
<img src="/assets/vacations/italy/colosseum.jpg" />
If your YAML contains a string instead of an array, or you’d like to target a specific item in the array, you can do that too:
photo: /assets/jerky.jpg
photos:
  - /assets/bacon.jpg
  - /assets/whisky.jpg
{{ photo }}
{{ photos:1 }}
/assets/jerky.jpg
/assets/whisky.jpg
For even more control, and to use data associated with your assets, you may use the Assets Tag.
These tags will convert your URL references to Asset objects, which in turn contain all the additional data for you to use in your templates.
{{ assets:photos }}
  <img src="{{ url }}" alt="{{ alt }}" />
{{ /assets:photos }}
<img src="/assets/vacations/italy/trevi-fountain.jpg" alt="The Trevi Fountain" />
<img src="/assets/vacations/italy/colosseum.jpg" alt="The Colosseum" />
Additional Custom Field Data
You may attach data (fields) to an asset just like you would with entries or pages. This is useful for things like alt text.
In the example above, we reference {{ alt }} within the assets tag pair. The value comes from what we’ve defined in the additional data.
Additional asset data is held within the asset container file, in an assets array. The relative path of the asset should be used as the key, with an array of data as the value.
Here’s what a container might look like:
title: Main Assets
path: assets
url: /assets
assets:
  vacations/italy/trevi-fountain.jpg:
    alt: The Trevi Fountain
  vacations/italy/colosseum.jpg:
    alt: The Colosseum
When moving or renaming an asset, be sure to update its key in this array.
If you’re using the Control Panel, this will be done automatically for you.
Note: If you don’t need any additional asset data, you need nothing more than the URL reference. (That’s one of the changes that landed in Statamic 2.5 - check it out.)
Private Assets
Sometimes it’s handy to store assets that shouldn’t be freely accessible through the browser.
This means you should put the container somewhere above the webroot, which in turn means that it doesn’t have a URL, nor will any of its assets.
You can reference and access private assets with a few extra steps.
Since private assets have no URLs, you must reference them with their IDs, the container ID and the path joined by a double colon.
top_secret_stuff:
  - confidential::docs/evil-lair-blueprints.jpg
However, you can’t iterate over top_secret_stuff directly since it doesn’t contain working URLs. If working with images you’d like to display, you can use the Glide Tag to transform it and render a copy in a public location. You can even just use the glide tag without any parameters.
{{ top_secret_stuff }}
  <img src="{{ glide:value }}" />
{{ /top_secret_stuff }}
Private assets may also have their own data which you can access using the Assets tag as mentioned earlier.
Image Manipulation
Image assets may be manipulated in a number of ways. You can alter size, color, quality, sharpness, and so on. We use Glide to power our image transformations.
Statamic provides a URL-based manipulation API through Glide. Everything runs through a manipulation route, which by default is /img. In other words, all images that start with /img/* will be manipulated.
For example, take this URL:
/img/assets/vacations/italy/trevi-fountain.jpg?w=100&h=100
- Statamic sees it’s an image manipulation URL because it starts with
/img/ - It sees the path to an image:
assets/vacations/italy/trevi-fountain.jpg - It will manipulate and output an image based on the parameters.
?w=100&h=100.
The appropriate way to generate these URLs in your templates is by using the Glide Tag.
{{ glide src="/assets/vacations/italy/trevi-fountain.jpg"
         width="100" height="100" }}
Or if you have a variable that references an image (let’s call it image_var), you can simplify your tag like this:
{{ glide:image_var width="100" height="100" }}
The Glide tag can also accept asset IDs for private assets, and even external URLs. It’s quite handy!
Visit the Glide Tag’s docs for more details.
Manipulation Presets
You may define named presets to simplify your templates.
Within site/settings/assets.yaml, you can add a list of presets with the keys as their names, and the values as an array of raw Glide API parameters. For example:
image_manipulation_presets:
  sml:
    w: 200
    h: 200
    q: 75
    fit: crop
  tall:
    w: 200
    h: 600
    q: 75
    fit: contain
Whenever you upload a new image asset through the control panel, all of that image’s presets will be created automatically.
You can disable this by adding image_manipulation_presets_generate_on_upload: false.
Note: if you are looking to use the fit: crop_focal feature with presets, don’t include a fit parameter in the preset definition, but rather ensure the Automatic image crop setting is turned on in the Assets settings page in the CP and Statamic will automatically use any focal points defined for your images.
To pre-generate the presets for existing assets, you can run the CLI command php please assets:generate-presets. (This will also generate some built-in presets used by the Control Panel)
To use presets combine them with a Glide Tag.
{{ glide src="/assets/vacations/italy/trevi-fountain.jpg" preset="sml" }}
Queueing Presets
Presets are generated when you upload the assets. Depending on how many presets you have, and what’s involved in each, this may take a long time, or even cause the request to run out of memory.
You may push the presets into a queue so they can run in the background. Here’s how:
- Ensure Redis is installed and running on your server.
- Add
QUEUE_DRIVER=redisto your.envfile. What’s an .env file?. - Run
php please queue:listen
You can use whatever drivers Laravel supports for queues. On Laravel Forge, beanstalkd is enabled by default.
Asset Container Drivers
The examples above assume you are storing your assets in folders within your site. However, it is possible to store them in other locations on your server, or even in the cloud using Amazon S3.
Within each container’s configuration file, you may specify the driver and its various options.
Local Filesystem
When a container doesn’t have a driver specified, Statamic will assume it uses the local driver.
title: Local Assets
path: path/to/asset/folder
url: /url/of/asset/folder
The path may be:
- A path relative to the main filesystem root. (eg.
path/to/assets) This can be inside or outside your site’s root folder. - An absolute path. (eg.
/var/www/example.com/assets) - An absolute path with an interpolated environment variable. (eg.
"{env:BASE_PATH}/assets")
As mentioned above, the url should be the location of the asset folder. If it’s located outside of the webroot, it’s inaccessible so you can just leave it blank. A container without a URL will be considered private.
Amazon S3
To enable S3 assets in a container, you should set up your container configuration file like so:
title: S3 Assets
driver: s3
key:     # Access Key ID
secret:  # Secret Access Key
bucket:  # The bucket name
region:  # The region code (eg. us-west-1)
path:    # A subfolder of the bucket, if you'd like
cache:   # A cache time in seconds. More info below.
url:     # URL prefix
The region codes can be tough to remember. Here’s a list of them.
S3 Filesystem Caching
Amazon S3 requires API calls to retrieve information from Amazon. With a lot of files, and a lot of actions, this can very easily become slow.
The filesystem may be cached with Redis to prevent repeated API calls.
- Ensure your server has Redis installed and running.
- Set the
cachekey in your container configuration file to the number of seconds a particular folder’s contents should be cached.